How to Jailbreak iOS 4.3.1 for iPhone, iPod Touch & iPad 1

Posted by GKE In , , , | 0 comments»
The Dev Team has released two new tools to jailbreak the latest version of Apple's mobile operating system, iOS 4.3.1. Both the PwnageTool and redsn0w allow users to perform an "untethered" jailbreak, which means that when rebooting your mobile device, it doesn't have to be connected ("tethered") to your computer in order to keep the jailbreak in place.

These jailbreaking tools were made possible by an exploit found by German security researcher Stefan Esser, who provided details regarding the exploit to the team.
Currently, this untethered jailbreak works on the iPhone 3GS, iPhone 4, iPod Touch 3G and 4G, AppleTV 2G and the original iPad. The new iPad 2 is not supported because of increased security on that device. The iOS 4.3.1 jailbreak requires a bootroom-level exploit to install, notes the Dev Team on its blog, and the iPad 2 is not susceptible to either of the two bootrom exploits available now (limera1n and SHAtter).

Redsn0w or Pwage Tool?
PwnageTool is the jailbreaking software that iPhone unlockers (those who run the phone on an unsupported mobile network) need to use. However, the Dev Team says that the accompanying software (ultrasn0w) is not yet ready for iOS 4.3.1. For now, unlockers need to hold off on using the new jailbreaking tools, or they will lose their unlock. When an updated version of ultrasn0w becomes available, unlockers will want to then use the PwnageTool app if on Mac, or Sn0wbreeze, the unofficial version of the tool for Windows.
For everyone just waiting to jailbreak, but not unlock, their mobile devices, redsn0w is ready now and is also much easier to use, says the Dev Team.
How to Jailbreak iOS 4.3.1 on Windows or Mac
  1. Download the redsn0w software for Windows or Mac.
  2. Extract and run the executable (Windows) or the .app file (Mac) from the Zip file you downloaded.
  3. Download the custom iOS 4.3.1 firmware (IPSW file) which you will use to restore your device using redsn0w. iClarified.com, which the Dev Team itself recommended, has a download available on this webpage. The direct link to the IPSW file from iClarified is available here. You can also download the IPSW file from iTunes itself, but be careful to "Download Only," not update. Note: RedmondPie, a go-to resource on jailbreaking, says only official firmware is supported.
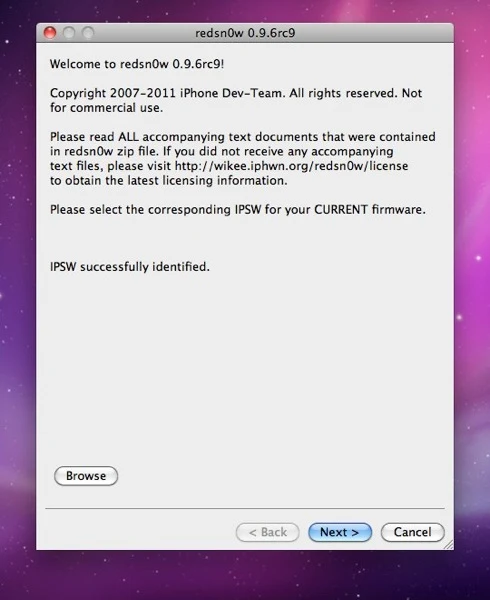
  4. Launch redsn0w and browse to the folder where you saved the custom firmware file you downloaded in step #3.
Download iOS 4.3.1 for iPhone 4, 3GS, 3G, iPad, iPod touch
Download Redsn0w 0.9.6RC9 for Windows
Download Redsn0w 0.9.6RC9 for Mac
Download
 iTunes 10.2.1 for Windows or Mac


    JailBreak iOS


    5.  On the next screen, make sure "Install Cydia" is selected, then click "Next."

    JailBreak iOS 1 TechBase


    6.  You will now need to turn your device off and plug it into your computer.
         Once off, click "Next."


    7.  Follow the onscreen instructions that explain how to put your device into DFU mode. This involves   series of button pushes. Hold down power for 2 seconds, then press the Home button for 10 seconds. 


    8.  While still holding down the Home button, release the power button. Keep holding down Home for 15 more seconds.

    JailBreak iOS2 TechBase


    9.   Redsn0w will then detect your device, reboot your device and jailbreak it. When the process completes, click "Finish."
    10.   When your device reboots, it will be jailbroken.


    Subscribe via RSS or Subscribe by Email.
    Like TechBase on Facebook

    XGPS150 Bluetooth GPS receiver gives you full GPS on your Wi-Fi only iPad or iPod touch

    Posted by GKE In , | 0 comments»
    The XGPS150 Bluetooth GPS receiver gives you full GPS on your Wi-Fi only iPad or iPod touch. Since no cellular radio means no GPS in Apple’s product line, this is a way to use your iPad Wi-Fi or iPod touch for apps that require more than just Wi-Fi triangulation, like turn-by-turn navigation. It is basically a Bluetooth GPS receiver that can be paired with your device of choice and it then sends accurate GPS location data to any app that can use it.
    GPS


    One of the big decisions when buying an iPad is always should you pay the extra for a 3G model with GPS. If you only need the GPS there is now another option. Of course, the GPS receiver will only work with apps that store the map data on your device; such as TomTom, Navigon, Co-Pilot Live etc.

    Other apps like Google Maps would still require a data connection as they stream the maps over a data connection.

    The receiver comes with a rechargeable battery that lasts up top 8.5 hours, a 12v car charger, non slip car mounting mat and strap to attach to a bag or armband. The XGPS150 costs $99 and has a free app which allows you to see detailed information on your location, number of satellites and signal strength of each.


    Subscribe via RSS or Subscribe by Email.
    Like TechBase on Facebook

    How To configure Your Browser for Free Browsing

    In configuring your PC for free browsing you have two options and the options are either to enter your settings in the system's main connection manager or to configure you browser alone.

    Either of the two options has its benefits. The benefit of configuring the overall system settings is that you might be able to have your windows update functioning, your antivirus updating and you can have almost all of the internet enabled applications on your system working but then you will definitely lose bandwidth generally especially if your connection is GPRS or EDGE. I connect using 3G so I use this option and most of the time I do not experience any form of lag in the connection. But if you are connecting using EDGE you might want to configure your browser only.

    Configuring Your Browser
    Not all browsers can be configured on their own. Below are some of the browsers you can't configure:
    • Google Chrome
    • Internet Explorer
    • Safari
    Below are some of the browsers you can configure
    • Mozilla Firefox
    • Opera
    • Flock
    In configuring your browser you have to know the Proxy Address and Port numbers that your free browsing software uses. For example, the popular Your-freedom uses the Proxy Address is 127.0.0.1 and port 8080 by default.
    Most of the time the proxy is the localhost - 127.0.0.1 so the most important thing is knowing the port number.

    How to configure Mozilla Firefox
    • Click on Tools on the Menu bar and go to Options
    • Then Click the Advanced tab
    Browser configuration

    • Next click Network tab under Advanced tab
    • Next click settings under the connection tab


    Browser configuration techbase


    • You can now enter the desired settings
    Some softwares can grant you access to all protocols(HTTP, SSL, FTP, etc) with a single port number but for some other softwares you might need to enter a different setting for each protocol.
    Even if you do not know which port to enter for each protocol if you know the default address(HTTP) it might just work for the others so you should just enter it then tick "Use this proxy for all protocols"

    If the config for SSL is different you should give it its own seperate port number but most of the time this is what works:
    HTTP Proxy: 127.0.0.1 (or localhost) Port: 8080
    Enable "Use this proxy for all protocols"

    How to configure Opera
    To configure Opera,
    • Click Menu >> Settings >> Preferences

    Browser configuration techbase

    • On the preferences window, go to Advanced then Click Network
    Browser configuration techbase

    • Next, click the Proxy Servers button
    Browser configuration techbase


    Enter the desired proxy address details
    You will see all the available protocols but note that Opera does not use the term SSL in its proxy server identification. Instead it uses HTTPS
    You should now enter your provided SSL Address and Port number here if you need to

    Configuring the whole system for Free Browsing
    In order to do this click your network icon and then click Open Network and Sharing Center (Vista and & Users)

    Browser configuration

    At the buttom left of the scree click internet options and then go to the connections tab

    Browser configuration

    You might see several connection profiles if you connect using more than one device such as MTN 3G, GLO 3G, etc.
    Determine the connection you are using and double click it to open its settings interface.
    Next, tick "Use proxy server for this connection"
    You can now enter your Proxy address (eg 127.0.0.1) and Port (eg 8080)

    Browser configuration

    If you have a different port number for SSL/HTTPS you should click on the advanced button (this opens another window)
    You can now enter a different port number for your HTTPS/SSL in the space labeled as Secure.

    Browser configuration

    With this setting, you will be able to use Chrome, Safari and Internet Explorer, Maxthon, Yahoo Messanger, etc for your free browsing configurations as well as other internet enabled applications on your PC.

    Note:
    If you configure your Mozilla Firefox or Opera for free browsing, you need to tick/enable "No Proxy" if you are not doing free browsing or else you browser won't connect.


    Browser configuration


    Subscribe via RSS or Subscribe by Email.
    Like TechBase on Facebook

    How to create customized Football Jersey for Facebook

    Posted by GKE In , , , | 1 comments»
    Creating a Jersey for your facebook profile picture is easy. Just follow the few steps below and with a few clicks your Customized football jersey is ready.
    To create the jersey,
    First go to this web address

    Then select your preferred team. 


    Create Football Jersey for Facebook-TechBase

    The next thing to do is to Select your preferred jersey theme/color

    Create Football Jersey for Facebook-TechBase

    After this you can choose a skin tone that probable matches your own skin tone


    Create Football Jersey for Facebook-TechBase


    The next is hair syele and then


    Create Football Jersey for Facebook-TechBase


    Hair color. 

    Create Football Jersey for Facebook-TechBase


    And that's all, your jersey is ready. 


    You now have the options to either save your new jersey image to your hard drive or upload it directly to your Facebook profile.


    Create Football Jersey for Facebook-TechBase


    Subscribe via RSS or Subscribe by Email
    Like TechBase on Facebook

    How To delete a folder or file that won't delete

    Sometimes due to errors on your computer hard drive, some files or folders might refuse to be deleted no matter what technique you try to use in deleting them. Sometimes I had to download file deleting softwares but they could not solve the problem.


    Unlocker is a utility program for bypassing restrictions on files in Windows. For one reason or the other, Windows just decides to make some files "un-deletable"

    The software is a very easy to use one. It integrates with explorer so you only need to right click on the stubborn file or folder and click on Unlocker as shown below.

    To delete any software or folder:
    Right-click on any file or file that is not deleting and select unlock from the explorer option menu then you can choose delete file from the displayed options.

    unlocker


    Subscribe via RSS or Subscribe by Email.
    Like TechBase on Facebook